Thai Yellow Curry Paste is easier than you think–but divine enough that you will not want to waste it! This post tells you how to stretch your Thai Yellow Curry–with a recipe for the actual paste at the bottom!

I spent last Saturday making Thai curry paste. I pureed enough hydrated dried chile peppers and coriander seeds for 2 batches of red curry and 1 batch of yellow, and then split them up to finish the red and yellow individually. The red was all frozen, but the yellow curry paste I used part of to make yellow curry that night for some friends who were visiting. If it had just been the 4 of us, it would have lasted 2 nights, but instead we had too much to throw away but not enough for all 4 of us for dinner the next night.
Don’t you hate that?
Some dishes, I am willing to just toss. Or send to work with John–although often he forgets to take it. But curry with homemade paste… well I know I have argued that homemade paste is easier than you think–and it really, really is, but there is still something about wasting any of it that really bugs me.
And so I stretch.

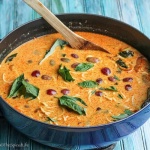
My original intention for this post was to share my recipe for Thai Yellow Curry Paste–and I have, down below. But it was pitch black out when I got the Yellow Curry onto the table–plus, well, guests. One of them I felt comfortable with telling to wait while I photographed, but she brought her boyfriend for us to meet, so I felt like I really needed to serve the meal, not photograph it. So the pictures ended up being of the ramen bowl several days later, which I will elaborate on. But the actual recipe for this post is the paste, especially because, like all good leftover dishes, the ramen bowl does not have a precise recipe, which makes sense, since you never know how much leftovers you will be starting with.
The first thing you should know is that my yellow curry was brilliantly orange. I have a theory about this–I was very excited when I bought my Dried New Mexico Chile Peppers, because they were quite fresh–supple and soft. I think as a result the shade of red they contributed to the dish was super brilliant and intense, because usually yellow curry is more golden. So don’t worry if yours is more yellow.
The next thing to know is that while you can make yellow curry with whatever protein and veggies you prefer, I served it with chicken, potatoes and red onions. Super simple, letting the yellow curry really shine through. To make it, just cook the curry paste (about 2 tablespoons of paste per serving) in some extra virgin coconut oil, then add the meat and potatoes. Cook for a bit, then add the onions, coconut milk and chicken stock to desired thickness, and then fish sauce and palm sugar to taste. It is that easy–most Thai curries follow that same blueprint.
As we extended it, I needed more “add-ins,” so canned pineapple chunks were added the first night, and fresh red grapes and Thai basil leaves were added in the second night. Chopped cashews or peanuts were also added to boost the protein as the chicken ran out. To make sure the flavor didn’t get too diluted, I also added more garam masala, curry powder and curry paste–an old red curry packet I found in the freezer (about 1/4 cup) and, on the third day, some commercial yellow curry paste, maybe a tablespoon. If I had not had commercial curry pastes, I would still have done all this, just changing the flavor a bit by adding ginger, garlic, garam masala and curry powder. (Note: if you are curious about my confidence in mixing red curry paste into the mix, check out this post on Thai Laksa–I figured I would end up with a similar curry powder plus red curry paste flavor).
Other than that the blueprint is simple– stock and coconut milk, to your desired thickness, palm sugar and fish sauce to taste, and, of course, ramen noodles. Or skip the noodles and make more rice–but the noodles are so curly and fun!

- 3 oz dried New Chile Peppers (Anaheim is a decent sub also)
- Boiling water
- 3 stalks of lemon grass, (the bottom 3 inches only, trimmed of tough outer leaves, finely chopped)
- 2 T minced fresh ginger
- 1 T coriander seeds, toasted in dry skillet
- 1 T cumin seeds, toasted in dry skillet
- 1 1/2 T Thai shrimp paste
- 6-8 cloves garlic, chopped
- 1/2 cup chopped shallots
- 2 T ground turmeric
- 2 T curry powder
- 1 T garam masala
- pinch of salt
-
Cut off the stems of the dried chile peppers and discard. Then slice length-wise down the chile pepper and remove the seeds and any prominent membrane. Place in a heat-proof bowl.
-
Pour boiling water over the dried chile peppers, enough to submerge them completely (I like to place a heavy-ish plate on them to hold them down). Leave them soaking for 20 minutes.
-
If you are using a regular food processor (see my links above regarding making paste with processor versus powerful wet dry grinder), use this time to pound the lemongrass with a heavy mortar and pestle and break down those fibers. After some time, add the ginger and pound it as well.
-
Place the coriander seeds in a small, dry skillet. Toast over medium heat. After 1-2 minutes, add the cumin seeds. When the spices are fragrant, another 1-2 minutes, pour them into a spice grinder or the wet dry grinder. Whichever implement you use, they first need to cool down a bit so set that aside.
-
Place the shrimp paste in a small square of foil. Fold the foil over the paste on all 4 sides, and then place in that same skillet over medium heat. Toast for 2 1/2 minutes on each side, and then remove to let cool.
-
By now the spices should be cool enough to grind. Whichever machine you are using, grind them until fine.
-
Place the rehydrated chile peppers in the processor or wet dry grinder. Reserve the soaking water--you can use it to loosen the blades anytime.
-
Process/puree the chile peppers. If you used a spice grinder, add the ground coriander and cumin. Process (or puree) again. Add the lemongrass and ginger--pounded if you are using a food processor but unpounded if you are using a wet dry grinder. Puree smooth.
-
During this process, if the machine heats up, take a break and let it cool. You do not want it to cook the paste. Also, regularly scrape the sides of the machine.
-
Add the remaining ingredients. Process or puree smooth again. Remember you can add some chile pepper soaking water if you need to.
-
Pinch a tiny amount of the paste and rub between your fingers. If it is gritty, puree some more. Repeat until it is mostly smooth.
-
Set aside to use or freeze for later use.
For the collage fans:

I LOVE curries – they always sound good… so even if there was like, a quarter cup leftover, I’d find a way to use it – ha!
I love curries of all kinds and the flavors in this sound so delicious!
That is so great! I always keep red and green on hand, but never worked with yellow and I’ve never made my own! Perfect!
Sammy is right. the board looks good behind the orange.
I LOVE curry! I always have red curry paste stocked away and sometimes green but never yellow. I need to try it!
Homemade curry paste is the BEST and sadly I haven’t made it in ages – I definitely want to try this!
Thanks for sharing! When I make curry pastes I sometimes get really caught up in using specific ingredients, like red Thai chilies, and end up wandering around grocery stores for hours. I like how you used what you had on hand and made something delicious!