Alex loves The Sound of Music. Since the moment she saw me watching it, she became obsessed. She calls it “Maria” and refuses to acknowledge any other name for it. When we first started watching it Nazis were kinda hard to explain–I just left it at bad guys who wanted to force the Captain to work for them and she accepted it.
We just watched it last week as part of a sick day movie marathon (yes my kids have all the germs too this time), and suddenly it was like she had jumped a level in understanding and inquisitiveness. I feel like I am tracking her developing maturity through The Sound of Music! Are ALL the Nazis bad guys? What did the Nazis want? What did they do? And then there was: Why is Maria upset/conflicted about a man liking her? Just what is a nun? Isn’t she their mommy? Oh ok, now they married–NOW she’s their mommy? Yikes. All of that was punctuated by “I like the Captain; he’s handsome!” (!) and, approximately 10 different times throughout the movie, proving she is still 5: “But WHY did they put a frog in her pocket, Mommy???”
I love kid brains. But I have a tendency toward brutal honesty that causes me to sometimes worry I will give them nightmares or overload their little minds.
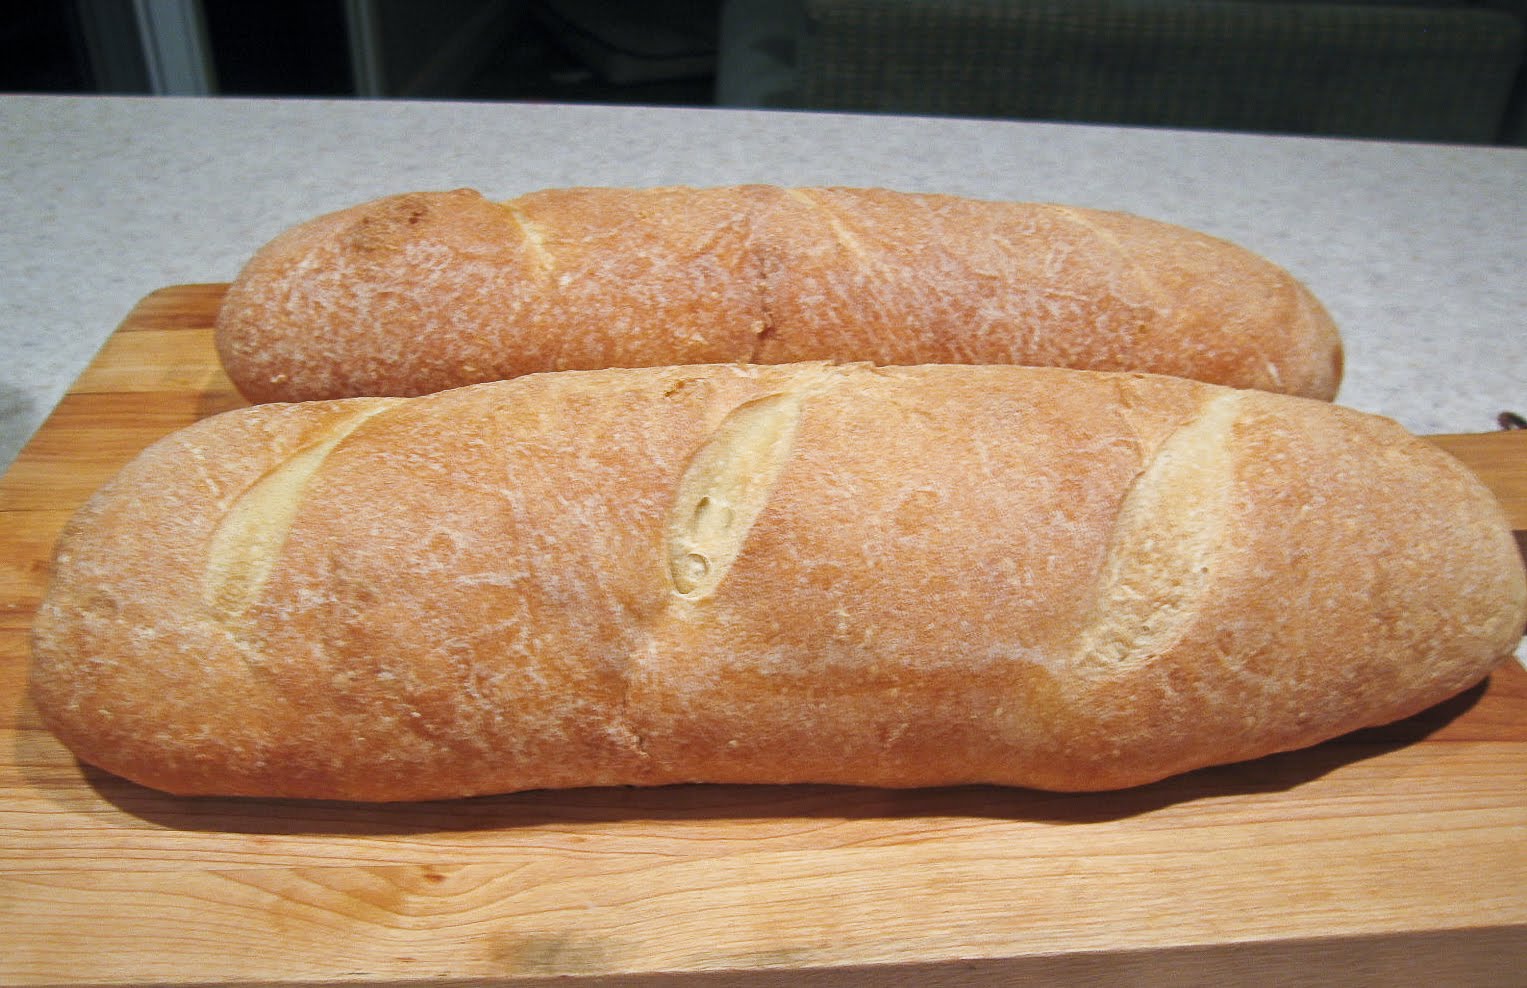
Anyway about this bread. Some friends and I recently created a very casual supper club which meets around once a month, sometimes with kids, sometimes not, always with spouses (if applicable). We had our first meeting this past weekend, the theme of which was Italian. I immediately signed up for bread and dessert. And for the bread recipe, I immediately turned to Peter Reinhart’s The Bread Baker’s Apprentice: Mastering the Art of Extraordinary Bread; Peter Reinhart, along with my mom, is my go to for all serious bread baking.
For whatever reason I expected this bread to be crustier, more like a French baguette. Maybe any of you who have lived in Italy can tell me whether the super basic artisan white bred (i.e., not ciabatta or foccacia or grissini, or…) is very crusty. My most perfect (to my mind) loaves had a crispiness to the crust, but they were still not super crusty. But maybe we expect all European bread to be like a French baguette and maybe Italian bread is not supposed to be so crusty?
At any rate, I made 5 loaves–the loaf that had the oven to itself was perfect (well I have no idea if it was perfectly authentic), as it had a soft interior and a crispy but not super crusty, browned exterior. All of the loaves had a wonderful, flavorful sweetness brought on by the use of a biga starter. But the 4 loaves that were in the convection oven did not develop as nice of crusts–I can only assume they were crowded. When I reheated one on convection the next day however, first wrapped in foil (stored in fridge) and then unwrapped on the rack for the last 5 minutes, it too had a perfectly crispy crust. So I guess the idea is first: try not to overcrowd your oven and second: if it turns out too soft try re-heating, wrapped in foil, at 350 F (325 F convection) for 10 minutes, unwrapped for another 5.
I am so excited about this bread because both the biga and the dough itself were super easy to work with. The dough is less sticky than the French bread dough, and as a result its supple elasticity is actually fun to knead. I am also excited because I am thinking I will try making a triple batch or so of the biga and store it in the freezer, so I can pull it out whenever I want an artisan-style loaf of bread. I realize that there are tons of methods by which to make a lot of bread dough and then bake some each day–but it does require using up a lot of bread dough in a short span of time. And it takes up so much space in your fridge! I like the idea of this better.
Try dipping this bread in a good dipping oil–I like one with cheese and herbs. It was absolutely fantastic.
I am submitting this bread to Wild Yeast‘s Yeastspotting. Check it out every week for the best yeast breads on the web.


- 2 1/2 cups (11.25 oz) unbleached bread flour (you can sub AP if need be)
- 1/2 t instant yeast
- 7-8 oz water, room temperature
- 3 1/2 cups (18 oz) biga (see above)
- 2 1/2 cups (11.25 oz) unbleached bread flour (or AP flour)
- 1 2/3 t salt
- 1 T sugar
- 1 t instant yeast
- 1 t diastatic barley malt powder optional (I did not use as I do not have)
- 1 T decent extra virgin olive oil not your pricey stuff though
- 7-8 oz water
-
Stir together the flour and yeast–you can do this in a mixer, my preference, or by hand. Add the water–starting with 7 oz or 3/4 cup. Stir until it comes together and makes a coarse ball. Adjust the water or flour as needed, to make a dough that is neither excessively sticky or stiff. Reinhart notes that at this stage it is better to err on the sticky side.
-
Either by hand or using a dough hook, knead the dough for 4-6 minutes (4 minutes on medium low speed with a dough hook). The dough should be soft and pliable but not sticky. Lightly oil a deep bowl and transfer the dough to the bowl. Cover with plastic wrap and set aside to rise until nearly doubled, 2-4 hours.
-
After the dough has doubled, knead it lightly to degas, and then place it back in the bowl. Cover again with plastic wrap and place it in the refrigerator for up to 3 days or place it in freezer bags and store it in the freezer (if you only want to bake one loaf at a time, divide the dough in half and store the 2 halves separately). Let it rest at the minimum overnight.
-
Remove the biga from the fridge 1 hour before baking (if using from the freezer, defrost overnight in the fridge and then, once thaw, remove it one hour before beginning bread recipe). Cut it into approximately 10 pieces now, while it is cold and easy to slice. Cover with a towel or plastic wrap and leave to warm up.
-
Stir together, in a large bowl or mixer bowl, the flour, salt, sugar, yeast and optional malt powder. Add the olive oil, biga and 3/4 cup (7 oz) water and stir until a ball forms. Add more water or flour as needed to get a shaggy but fairly cohesive ball. Transfer to kneading–either by hand or with the dough hook. The dough should be slightly sticky and soft–but not super sticky. When it is where you want it, knead for 10 minutes, adding flour as needed (10 minutes by dough hook or hand). Lightly oil a deep bowl and place the dough inside it. Cover with plastic wrap and leave to rise at room temperature for about 2 hours, or until the dough doubles in size.
-
Gently divide the dough into 2 pieces of about 18 ounces each (for batards–you can also make torpedo rolls of about 4 ounces each). Gently–try not to degas the dough too much but also don’t get too hung up on this–stretch the dough into a rough rectangle about 12 inches long. Fold the dough as though you were folding an 8X11 sheet of paper to mail–fold the bottom third up and then fold the top third down. Use your hands to gently seal the dough and increase the surface tension. Accept that your batards will not be perfect unless you are super experienced (I am not). They’ll taste great either way.
-
If I am baking a lot of loaves, I bake them on parchment paper right on the cookie sheets that they rise on. For just one loaf, however, I place my pizza stone in the oven and I place the batard on parchment paper on a rim-less cookie sheet (or a baker’s peel if you have one). Lightly spray the tops of the loaves with oil and then gently lay plastic wrap over them. Let rise at room temperature for 60-90 minutes. They will rise to 1 1/2 times their original size.
-
Minutes before baking, prep your oven. Place a rimmed jelly roll pan or a cast iron skillet on the bottom of the oven. Turn the oven on to 500 F and bring a kettle or pot of water to boil.
-
When it is time to bake your bread, use your sharpest knife and make 3 diagonal slashes on your loaves. This is something I still struggle with; just do your best. (They have special baker’s razors you can buy but I’ve never gotten one.)
-
When it is time for the loaves to bake, make sure you have several things ready before opening the oven. Have a spray bottle with water ready, and have the hot water that you boiled ready. Also have a dry towel that will cover your oven door ready. Open the oven and place your loaves inside (either on their sheets or slide the parchment off of the sheet onto a baking stone). Working quickly, cover the oven glass with the dry towel (this is important-the slightest drop of water will cause your glass to crack in that hot of an oven. Trust me, I know). Pour the hot water into the cookie sheet or skillet in the bottom of the oven. Immediately spray the sides of the oven and shut the oven door. Wait 30 seconds and open, repeat the towel and spray parts. Repeat again 30 seconds later (so you will have sprayed 3 times).
-
After the final spray, reduce the oven temperature to 450 F for a softer bread or 400 F for a crustier bread. Unless you have a convection oven, plan to rotate the bread for even baking halfway through. At 450 F the loaves will take about 20 minutes to finish; at 400 F it will take a little longer. Watch for the crust to become golden brown and then check the internal temperature with a meat thermometer–it should register 200 F.
-
Transfer the loaves to a cooling rack and let cool for 1 hour before slicing.
Affiliate links were used in this post, but only to link to items I would be discussing and linking to in any case.
The bread looks amazing.
I do NOT envy you having to deal with questions about nazis but I DO envy your bread baking abilities! This looks great!
This looks great. I have been dying to make italian bread. I love the crust on it.
I love that you wrote this: "I love kid brains. But I have a tendency toward brutal honesty that causes me to sometimes worry I will give them nightmares or overload their little minds."
I share your sentiments. I love kids and think that i even have their mind for brutal honesty, only i've experienced more as an adult that I'd like to shield them from. they'll get there in due time. i believe in treating children as conversation equals though. if you do that they develop much faster and go on to really rock the socks off of the other children at school!
the bread looks great by the way. cheers.
That's really cute to watch together, and you are so right! They really do say the darndest things…and ask sooooooo many questions!! Maybe we should learn more from them. This bread looks like the PERFECT loaf. Hmm.
Children have beautiful minds but they are so brutally direct, aren't they? My husband and I have a rule that we will not lie to our children when they ask a direct question, we just "kid it down". This is why in "Olibia" there is a very bad man who won't let children have movie night or eat pizza and that is why the people don't like "Ghadabi". It works.
I find your method of spraying the inside of the oven very interesting! I have always used an oven safe bowl, filled with water and placed on the bottom rack for the first 5-10 minutes of baking time to work well. It's also a little less frantic and nerve-wracking because I just know I would crack the window. Wonderful bread and you've inspired me to get my girls together for a supper club.
i LOVE the sound of music. it never gets old. i also love a good crusty italian loaf (and justified and timothy olyphant!). 🙂
Kids are the best… I love listening to them because they are just so honest… no filters! 🙂
Great bread… I am imagining a nice crunchy crust with a soft middle… yummy!
delicious post this bread looks fabulous
making bread at home is always more rewarding isn't it
You are totally inspiring me to venture into bread making because this loaf here looks fantastic.
This bread looks so delicious! Thanks for sharing this!
We watch the Sound of Music at least once a year. It is a wonderful movie although Adam tells of how his Mom took him to see it six times when he was a little boy and it took me a long time to convince him that this really didn't qualify as childhood trauma. He also tells me that Italian bread is indeed crusty – he lived in Rome for many, many years and assures me it is so. Regardless, there is nothing better than fresh baked bread and your recipe looks lovely.
My kids have asked me some wild questions! It certainly helps to take a deep breath and laugh about it! Lovely bread – homemade always tastes better!
This bread looks lovely. I have such a nightmare with yeast but maybe if I leave it for 2-4 hours it might rise! I am definitely not giving up I will conquer it eventually!
I’m Italian and when my Grandma makes Bread AKA Italian bread it is not really to Crunchy on top. Nothing like the French Bag. It looks great just like my grandmas! So I give ya two thumbs up!
Hi Laura.
I loved your thorough recipe for this Italian bread. I baked mine today after I let the Biga in the refrigerator for the three days. I am like you, I thought it would be crustier. I have a Wolf Convection Oven. I would love to try it on convection. What did you set your convection temperature at?
Thanks
Conventional wisdom says reduce it by 25 F but I prefer reducing it by 10-15 F. Every oven is, of course, different. I would start with 15 F less and go from there.
Slight confusion on recipe measurements, could you clarify. Says above 2 1/2 cups unbleached flour for making Biga. But when you start to make bread days 2, 3, or 4 days says add 3 1/2 cups Biga (does not match instructions to only make 2 1/2 cups flour measurements to make Biga?) to 2 1/2 new cups of bread flour plus additional ingredients. Wouldn’t you also have to adjust yeast measurement to add more in Biga and salt more if making more flour in Biga?
The biga will expand from the water and yeast added to it to become at least 3 1/2 cups (and will of course be heavier from the added water). Make sense? 2 1/2 cups of flour should make at least 3 1/2 cups of biga once the water and yeast are added.