
During the years I lived in State College, PA, I saw many pumpkin whoopie pies for sale. And for some reason I always stared longingly but talked myself out of buying. I have no idea why–some misguided attempt to be healthy?–but whatever the reason I had never made nor eaten whoopie pies before Sammy’s and my most recent baking adventure.

This was a fun one to do with kids. It could be mixed by hand, and the assembling of the whoopie pies could be done by kids as well, since the top layer of the cookie covers up any mistakes (unlike, for example, cupcakes). This recipe is closely adapted from one in The King Arthur Flour Cookie Companion: The Essential Cookie Cookbook, one of my most reliable go-to cookie cookbooks.

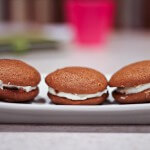
I sent at least half of the whoopie pies in to John’s class, where they were greatly appreciated. The cakey cookie layers are super moist, like pumpkin bread, and like pumpkin bread, they are best eaten within a day or two, before that moistness gets a little gummy. But fresh these are stellar, especially with a cream cheese filling.

I actually let Sammy help me with the handheld mixer while making the filling. Obviously, it was a 2-person affair.

Most of the cookies were frosted by Sammy with me holding the cookie. But for the first few, she did the whole thing.

I love this picture because of the sense of accomplishment radiating from Sammy. She is so clearly pleased with her completed cookie.

- 15 oz can 1 1/2 cups pumpkin puree
- 2 large eggs
- 2 cups (16 oz) brown sugar
- 1 cup vegetable oil
- 2 T (1 1/2 oz) dark molasses
- 1 t salt
- 1 t ground cloves
- 1 t ground ginger
- 1 t cinnamon I recommend a solid cassia, like those from China
- 1 t baking powder
- 1 t baking soda
- 3 cups (12 3/4 oz) AP flour
- 1 T unflavored gelatine
- 2 T water
- 1/2 cup (1 stick, 4 oz) unsalted butter, room temperature
- 1/2 cup (4 oz) cream cheese, room temperature
- 2 1/4 cups (9 oz) confectioners' sugar
-
Preheat the oven to 375 F. Line 2 baking sheets with parchment paper or silicone and set aside.
-
Dump the pumpkin, eggs, brown sugar, oil and molasses into a large bowl. Whisk together just until smooth. Switch to a silicone spatula, and beat in the salt, spices, baking powder and baking soda. Fold in the flour gently and then beat for 1 minute until smoothly combined.
-
I prefer a smaller whoopie pie, so I used a mid-sized cookie scoop to scoop out the batter onto the prepared sheets, leaving 2 inches between "blobs" for spreading. You could go as high as a 1/4 cup scoop.
-
Bake the cookies for 8-12 minutes (depending on what size scoop you used), or until they feel firm to the touch and have that slightly dried out look (instead of looking wet and batter-like). Let the cookies cool for 5 minutes on the sheet before transferring to a cooling rack to cool completely.
-
While the cookies are baking and cooling, begin working on the filling.
-
Pour the water over the gelatine in a small microwaveable bowl. Set it aside to soften.
-
Beat the butter and cream cheese until fluffy, using a hand held or stand mixer. Heat the softened gelatine very gently (about 30% power, short increments) in the microwave to dissolve the gelatine--stir it occasionally. Set aside.
-
Add half of the confectioners' sugar to the fluffy butter mixture and beat it in. Beat in the dissolved gelatine. Add the remaining confectioners' sugar and beat it smooth.
-
When the cookies have cooled, assemble the whoopie pie by spreading a tablespoon or 2 of filling onto the bottom of one cookie and covering it with another cookie, bottom side down towards the filling.
Amazon affiliate links were used in this post, but only to link to items I would be discussing and linking to anyway.
You guys make a fabulous baking team! I’ve never had whoopie pies that I haven’t made myself, though they are definitely readily available now in NYC. Pumpkin and cream cheese frosting are a match made in heaven!
You lived in State College??? I’m from a little town just over the mountain from there. Did you go to school there??
Pumpkin and cream cheese sound divine!
Awww, most adorable instructional pictures ever!
Still have never tried a whoopie pie… they look wonderful, though!
These look wonderful and Sammy did a great job putting them together!