Print
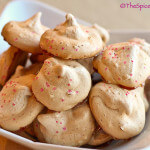
Strawberry Rhubarb Meringues
Adapted from Annie Bell
Ingredients
- 1/4 cup strawberry rhubarb jam
- 5 large egg whites
- 1 pinch of cream of tartar
- 1 2/3 cups (scant) confectioners' sugar, sifted
- bright sparkling pink sanding sugar for sprinkling
Instructions
-
Preheat the oven to 275 F. Line 3 baking sheets with parchment paper or a silicone mat.
-
Gently heat the strawberry rhubarb jam to loosen it, then press it through a fine mesh sieve to remove the solids. Set aside.
-
Whip the egg whites in a clean bowl until frothy, and then add the cream of tartar. Continue whipping. When it is thicker and more opaque but still not holding any kind of peak, start adding the confectioners' sugar, 1 tablespoon at a time. Continue until all of the sugar is gone, and whip the egg whites until they are glossy and hold a stiff peak.
-
Using 3-4 folding motions, fold the jam into the egg whites--if they are streaky that is fine.
-
You may either dump your meringues onto the prepared cookie sheet like drop cookies, or you may scoop the mixture into a piping bag and pipe the individual meringues out onto the cookie sheets. I prefer smaller meringues. Keep about an inch between meringues.
-
Sprinkle the meringues with the pink sanding sugar.
-
Place in the oven and reduce the heat to 225 F (because these bake at such a low temperature I think you could try baking 3 sheets at once if you have enough racks; 2 sheets in the conventional oven worked just fine). Bake for 2-2 1/2 hours, until the outsides of the meringues are crispy. Turn off the oven and let the meringues cool inside the oven for another 30 minutes.
-
Remove the meringues from the oven and use a thin spatula to remove them--if they stick at all, return them to the oven and let them cool in the heat for another 15 minutes (these meringues were a little sticky because of the jam, but once they were done they all popped off the pans without problem).
-
Let cool completely.