Print
Flourless Chocolate Cake: Review of What To Bake
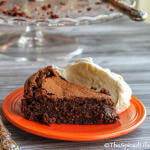
Recipe shared with permission of publisher. From Jane Hornsby: A flourless chocolate cake is my dessert hero, especially when feeding friends who are avoiding wheat. Luckily, this kind of cake is best made without flour anyway, the nuts and chocolate providing the structure and a decadently gooey texture within. The espresso bolsters the chocolate flavor rather than adding a coffee taste of its own. NUT OPTIONS If you can’t find pre-skinned (sometimes labeled as blanched) hazelnuts, buy skin-on instead and remove the skins at home. Spread them out in a roasting pan and cook for 8 –10 minutes at 350°F until the skins start to crack and look flaky. Pour them into a clean dish towel and rub vigorously to loosen. If a few skins remain attached, don’t worry. This process will also toast the nuts, giving a rounded and full flavor to your cake. Or, to make the whole process quicker, you could use 1¼ cups almond meal instead.
Ingredients
- • 1¾ sticks butter ¾ cup plus 2 tbsp, plus extra for greasing
- • 1 cup skinned hazelnuts or almond meal, see Tip
- • 1 packed cup light brown sugar
- • 7 oz bittersweet chocolate 70% cocoa solids
- • 2 tbsp fresh espresso or 1 tbsp instant espresso mixed with 2 tbsp just-boiled water
- • 1 tsp vanilla extract
- • 5 eggs room temperature
- • ¼ tsp salt
- • 1 tbsp cocoa powder for dusting
Instructions
-
Generously grease a 9-inch round springform pan with butter, then line the base with parchment paper. Preheat the oven to 350°F. Put the nuts in a food processor with 1 tablespoon of the sugar, then process until finely ground. If using almond meal, skip this step and add the sugar later on.
-
Break the chocolate into a medium heatproof bowl and add the butter, coffee, and vanilla. Melt together gently, either set over a pan of barely simmering water, or in the microwave. Stir until smooth, then set aside.
-
Crack the eggs into a large bowl, add the rest of the sugar, then whisk for 5 minutes with an electric mixer until thick, mousse-like, and doubled in volume.
-
Pour the melted chocolate around the edge of the bowl (this prevents it from knocking too much air out of the foam). Using a large metal spoon, fold the chocolate in. It might take longer than you expect to get the batter to an almost even brown, and before little ribbons of chocolate stop appearing.
-
Sprinkle the ground nuts and salt into the bowl, then fold them in until evenly blended. Carefully pour the batter into the prepared pan.
-
Preserving the air is the name of the game.
-
Bake on the middle shelf of the oven for about 35 minutes, or until the cake has risen and is set on top, with a just-perceptible wobble underneath the papery crust when you jiggle the pan. Put the pan on a cooling rack as it cools. The torte will sink and crack a little, which is fine.
-
If serving the cake cold, it’s easy to transfer it to a plate: just unclip the sides of the pan and use an icing spatula to loosen the cake and its lining paper away from the base. To serve warm, leave it in the pan, as the cake is quite delicate. Put the cocoa in a fine-mesh sieve and give the cake a good dusting. Serve with whipped cream, ice cream, and perhaps some berries if you like. The cake can be made up to 2 days ahead (I actually prefer it the next day) and kept in a cool place. Let it come to room temperature before serving.