Print
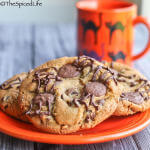
Spider Infested Chocolate Chip Cookies
Decoration idea closely adapted from Hungry Happenings; cookie recipe by The Spiced Life.
Ingredients
- 2 cups (8 1/2 oz) AP flour
- 2 cups (8 1/2 oz) white whole wheat flour
- 1¼ t baking soda
- 1½ t baking powder
- 1½ t coarse salt
- 2½ sticks (1 1/4 cups) unsalted butter
- 1¼ cups (10 oz) light brown sugar
- 18 T (1 cup plus 2 T; 8 oz) granulated sugar
- 2 large eggs
- 1 T natural vanilla extract
- 16 oz (3 scant cups) semi-sweet chocolate chips, plus 1 cup more for melting
- 1 cup chocolate coverture wafers or larger chocolate chips (milk or dark chocolate)
- Coarse sea salt for sprinkling, optional
Instructions
-
Whisk together flours, baking soda, baking powder and salt in a bowl. Set aside.
-
Using a mixer fitted with paddle attachment, cream butter and sugars together until very light, about 5 minutes. Add eggs, one at a time, mixing well after each addition. Stir in the vanilla. With speed on low, add the dry ingredients and mix until just combined, 5 to 10 seconds. Mix in the 16 oz chocolate chips. Cover the dough with something airtight and refrigerate at least 2 hours, preferably overnight.
-
When ready to bake, preheat the oven to 350 F. Line a baking sheet with parchment paper or a silicone mat.
-
Using a cookie dough scoop or an ice cream scoop of medium size, scoop the cookies onto the prepared tray, 6 per sheet. I was aiming for 2 tablespoons of dough per cookie.
-
Press 3-4 (depending on size) couverture wafers or larger chips into cookie dough ball. Try to separate them as much as possible so you will have room for your spider legs.
-
Sprinkle the cookies with sea salt if desired and bake until golden brown but still a little soft, about 12-15 minutes. Transfer the baking sheet to a wire rack.
-
Melt the remaining cup of chocolate chip until stirred smooth (I prefer 30 second increments in the microwave at 50% power). Let cool for a moment or 2.
-
Trim the tiniest corner off of a plastic bag and insert a tiny circular decorating tip. Scrape the melted chocolate into the plastic bag.
-
Carefully squeeze the chocolate out the decorating tip to draw lines onto the spider bodies. We went with 6 legs even though it was inaccurate to save space!
-
Let the cookies cool completely either on the cookie sheets or on a cooling rack. Be certain the chocolate legs have hardened and set before layering the cookies in an airtight container.