
And just as I got nice and caught up with blogging, we set about moving The Spiced Life to WordPress. And all blogging stopped–as well as tv watching, phone calls, and laundry, as we set about figuring it all out. Actually my husband did most of the figuring, while I have just tried desperately to understand everything I am doing. Thank goodness I am not responsible for what he is doing. He’s earned his weight in gold with this.
(And on that note let me please ask you to be patient–please let me know of anything that is not working correctly, there is a lot involved to this and we are DIYing it which is a bit crazy.)
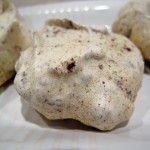
So about these cookies. I’ve never made meringue cookies before–actually I’ve never made meringue anything before so these were quite the adventure. I never thought I would like it, because it is so sweet, but then I was reading Alice Medrich’s Chewy Gooey Crispy Crunchy Melt-in-Your-Mouth Cookies by Alice Medrich (I’ve said it before–if you do not yet own this book you must not like cookies) and I realized that meringue cookies actually make a good base for other flavors. For some reason I would have thought this was not the case, like maybe it would destroy the actual meringue, but apparently not so. The first 2 flavors I chose were peanut butter (shock) and chocolate (even bigger shock haha).

You should know from the get-go that I had to use Jiff peanut butter for the peanut butter cookies, which in retrospect was a mistake. They are too sweet. However, I think that the cookies would be better a little salty anyway, so if all you have is non-natural peanut butter, you could try adding salt to cut the sweetness a bit (they were not by any means bad, but next to the chocolate meringues they were noticeably a tad too sweet).
The Bittersweet Chocolate Meringues were one of those big discovery where have you been all my life cookies. I am certain they will get made again; delectable does not come close to describing them. Everyone has loved them; they are crispy and crunchy and yet they melt on your tongue and despite being barely flecked with brown from the chocolate they are intensely, unmistakeably chocolate cookies.

- 5 oz bittersweet chocolate prefer minimum 70% cacao, finely chopped
- 2/3 cup (4.625 oz) sugar
- 1/4 t fine sea salt
- 3 large egg whites
- 1/8 t cream of tartar
- coarse grey sea salt
-
Preheat the oven to 200 F. Position racks in the upper and lower thirds of the oven.
-
In a clean, dry bowl place the egg whites with the cream of tartar. Using a whip attachment, beat at medium high speed with a stand mixer or high speed with a hand mixer until the egg whites are creamy white and hold a soft peak. Continue to beat, adding a little sugar at a time, until you've used all the sugar. This should take 1 1/2 - 2 minutes, until the whites are very stiff.
-
Sprinkle the salt and the finely chopped chocolate over the stiff egg whites. Gently fold the chocolate into the egg whites.
-
Drop heaping teaspoons of batter 1 1/2 inches apart on a parchment-lined baking sheet. You may also choose to pipe the batter, but I am not that fancy (and I paid for it too as my chocolate meringues are all sorts of crazy shapes). Sprinkle the dropped batter with the grey sea salt to taste.
-
Bake for about 2 hours, rotating the pans front to back and top to bottom halfway through. Remove a test cookie and let it cool completely--warm meringue cookies are apparently always soft. You are testing for crispiness. At such a low temperature, the remaining cookies will not burn while they wait for your test. If the cookie is not completely crisp (it should not be chewy or stick in your teeth at all), continue baking and test at 15-20 minute intervals.
-
When the cookies are crisp, turn the heat off and let them cool in the oven. If you have a new oven, like me, it may take forever for them to cool; I took them out after about 1 1/2 hours, when the pans were still warm and let them cool on my counter.
-
Cool completely before storing but do store in an airtight container immediately after cooling. I won't claim they store indefinitely (Medrich says several weeks) but they definitely store well.

Affiliate links were used in this post, but only to links to items I would be discussing and linking to anyway.
Oh my goodness…after following your meringue tales on Twitter I think they def. look awesome. Feel free to send those chocolate ones my way anytime.
Both the new blog site and the cookies look great!
The blog looks great and I’m so glad the move was successful! I’ve yet to venture into the world of meringues but these are two fabulous flavors for when I do!
I have such a weakness for meringue when it’s done just right! Yours look perfect. GREG
The new blog looks great!
I love the “print this feature” very nice!
These are insane…light, yet rich and decadent. Love it! Theresa
The new blog looks great! Just a quick note to let you know that for those readers in Google Reader, it did not switch over to the new URL. I had to go and pick it up manually and resubscribe.
Thanks for letting me know, I will see if I can figure out why and what to do about it. Thanks re: the blog. 🙂